Laptops, computers, and tablets installed with the Windows 10 are more than capable of connecting to a network and accessing the internet. Considering this, users are still unexpectedly susceptible to malfunctions and problems that prevent Windows 10 from successfully connecting to a Wi-Fi network.
It’s one of the most annoying problems you might have when your Windows 10 Wi-Fi is not working. Since, so many tasks that we do rely on a web connection, being disconnected from the internet may put a stop to your productivity.
Reasons Of Windows 10 Wi-Fi Not Working
There might be several reasons why Windows 10 Wi-Fi won’t work:
- When the SSID or password entered is wrong.
- The network connection is out of range or if there is any interference.
- Wi-Fi is connected, but there are some other issues.
- Driver or hardware issues
Wi-Fi network connectivity issues can also occur due to improper settings for Windows 10 apps and overcrowded internet access points. Since there are many possible reasons, you’ll have to go through several steps to figure out what’s wrong and how to fix it.
Methods To Solve Windows 10 Wi-Fi Not Working
Continue reading to learn how to fix Windows 10 when Wi-Fi is not working.
Uninstall The Network Adapter’s Driver
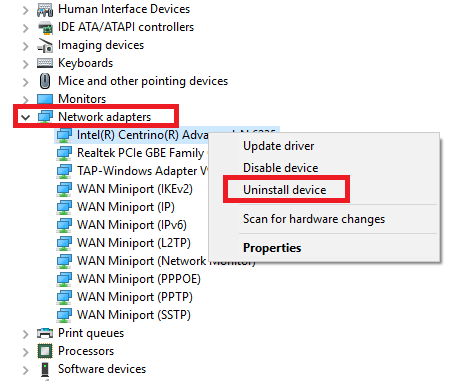
If you receive a message stating Windows 10 can’t connect to this Wi-Fi network when trying to connect to the internet, your network adapter is most likely at fault. The best solution is to remove the network adapter’s driver and let Windows automatically reinstall it.
To accomplish this procedure, you can follow the below-mentioned steps:
Step 1 – Click Device Manager by pressing Windows key + X.
Step 2 – Uninstall the network adapter by right-clicking on it.
Step 3 – If requested, select ‘Delete’ this device’s driver software.
Step 4 – Restart your PC, and Windows will reinstall the driver for you.
Network Troubleshooting
Windows 10 may indicate that you are connected to the internet and that the connectivity is safe, but you will not connect to the internet. A malfunctioning IP address, TCP/IP stack, or DNS client resolver cache are the most common causes of the problem.
To begin with, use Windows’ built-in Network Troubleshooting tool. It may be found under Settings > Update and security > Troubleshoot > internet connections.
If the steps mentioned above don’t work, open a Command Prompt window and type the commands given below. Press ‘Enter’ after you type each command.
- ipconfig /release
- ipconfig /renew
- netsh winsock reset
- netsh int ip reset
- ipconfig /flushdns
Find Wi-Fi Password
If you get a new router, take the time to change the default username and password. From a security perspective, it’s an excellent idea. What happens if you lose track of the password you created? You could reset the router, but there’s a less severe alternative. Windows 10 has a feature that allows you to find stored Wi-Fi passwords.
Here is how you do it:
Step 1 – On the Taskbar, right-click the Network icon.
Step 2 – Select Open Network Internet Settings from the menu.
Step 3 – Change adapter options are the first option in the new window.
Step 4 – Select Status by right-clicking on your Wi-Fi connection.
Step 5 – Select Wireless Properties from the menu.
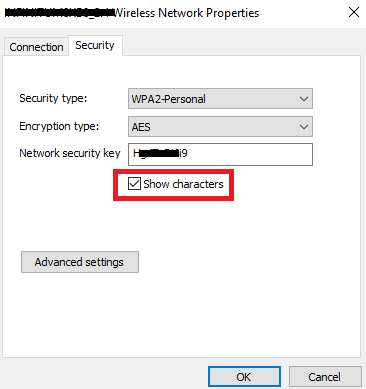
Step 6 – Click on the Security Tab.
Step 7 – Click the checkbox which is next to show characters.
Correct the IP Configuration
If the Wi-Fi does not have a Valid IP Configuration notice, try the four networking instructions we described earlier. There are two more actions you may do if the problem persists and your Wi-Fi is still not working on Windows 10.
- Change the Network Password and Name
Many users said that their issue with the Wi-Fi connectivity got resolved by just changing the name and password of the network. The exact steps vary per router, but you generally need to connect to your router with an Ethernet wire, insert the IP address in your browser, log into the device’s gateway, and select the necessary sections. When changing this information, make sure you’re using the proper kind of Wi-Fi security.
- Set the Channel Width of the Wi-Fi Network
Routers may broadcast their networks on multiple channels. The frequencies might get congested if too many routers nearby use the same channel.
Therefore, navigate to the channel setting on your router’s portal. Set it to Auto if at all feasible. If the Auto setting isn’t available, try a few alternative channels to see if the problem goes away.
Disable The Network Adapter
Suppose your Wi-Fi connection in Windows 10 keeps disconnecting without notice, while you are damn confident that there’s no issue with the router. In that case, the issue might occur because of the power management settings on your network adapter.
To preserve this power, you must withdraw the permission that permits Windows to switch off the adapter. You’ll need to go back to the Device Manager to perform this:
Step 1 – Click on the start menu and select device manager.
Step 2 – Enlarge the Network Adapters list.
Step 3 – Right-click on your network adapter and choose Properties.
Step 4 – Select the Power Management option from the menu.
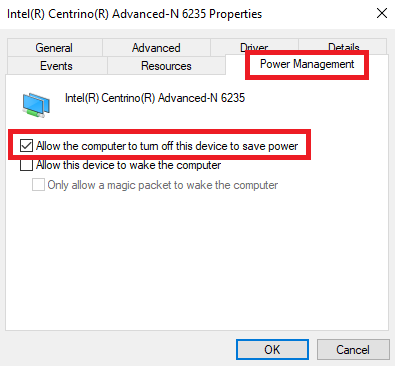
Step 5 – To save power, uncheck the option to Allow the computer to switch off this device.
Update the Wi-Fi Driver to Fix Wifi not Working on Windows 10
There are a few things that you may do if your Wi-Fi driver isn’t working on Windows 10. You could either try updating the Windows 10 driver or returning to a prior version.
Read the instructions below to upgrade your Wi-Fi driver:
Step 1 – Click the Start Menu with a right-click
Step 2 – Go to Device Manager and select it.
Step 3 – Extend the drop-down menu of Network Adapters.
Step 4 – Select Properties from the menu bar when you right-click on your adapter.
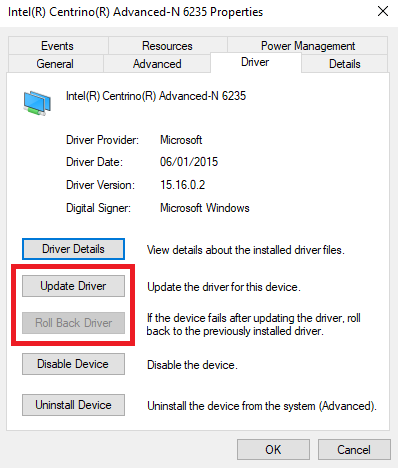
Step 5 – Click on the Driver tab
Step 6 – Select either ‘Roll Back’ or ‘Update Driver’ Driver from the menu.
Note – If Windows is still unable to find an updated driver, you should be able to locate it on the manufacturer’s website.
Changing The Region Of Your Wi-Fi Adapter
Conduct some simple troubleshooting tests before continuing if your Windows 10 Wi-Fi won’t enable. Consider upgrading or reinstalling the network adapter’s driver. We’ve previously demonstrated how to accomplish it. If that does not work, then you can try changing your Wi-Fi adapter’s region. It’s easy to accomplish; simply follow the steps below:
- Press Windows key + R.
- Press Enter after typing devmgmt.msc.
- Expand the Network Adapters section.
- Right-click on your network adapter’s name.
- Select your desired properties.
- Select the Advanced icon.
- Highlight the country and region.
- Select the appropriate entry for your location.
Forget A Wi-Fi Network
You may occasionally require your computer to forget about a Wi-Fi network that you had added to it. Perhaps you’ve upgraded your router, or you might be simply clearing out old networks that you used to access but no longer use. Let us have a look at how to forget a Wi-Fi network in Windows 10:
Step 1 – Select Settings from the Start Menu.
Step 2 – Select Network and Internet from the menu.
Step 3 – From the menu on the left-hand side of the screen, select Wi-Fi.
Step 4 – Select Manage known networks from the menu.
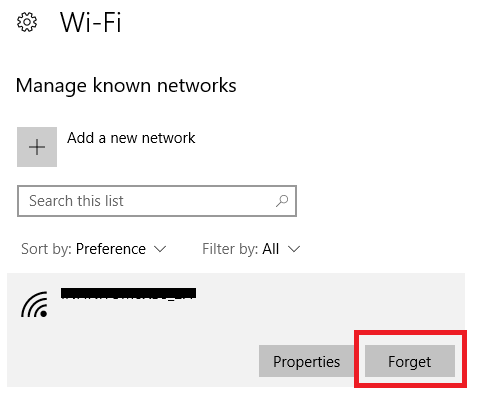
Step 5 – The name of the network you wish to forget will be highlighted.
Step 6 – Click on Forget.
Turn Off The Firewalls
Your Windows 10 boasts an in-built firewall application. To protect you from malicious content, it allows or restricts the outgoing and incoming traffic. Furthermore, it can occasionally prevent your entire computer from accessing the internet. Fortunately, whatever the problem, there is a simple remedy. The following solution applies to both the native firewall software and any third-party firewall programs that you may be using:
Step 1 – Type Command Prompt in the Start Menu.
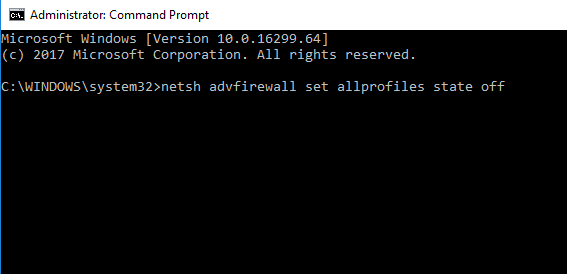
Step 2 – Select Run as administrator from the menu when you right-click on the top link.
Step 3 – Press Enter after typing netsh advfirewall set allprofiles state off.
Step 4 – Check to see whether internet access is currently available.
Step 5 – Return to Command Prompt and run netsh advfirewall set allprofiles state on to reactivate your firewalls.
Disable the Antivirus Service
Anti-virus software, like the firewall, can create connectivity problems. Go to the Windows Defender Security Center to check which anti-virus programs are installed on your computer. It may be found in the Start Menu’s ‘All Apps’ list.
Enlarge the panel on the left-hand side and choose ‘Virus and Threat Protection’ when you’ve started the software. It’ll inform you which programs are running and give you a shortcut to their interfaces. Access the UI of any applications you’re using and turn off the service for the time being.
Conclusion
Hope that, out of the 10 solutions that we have mentioned above, at least one of them will help when your windows 10 Wi-Fi is not working. Make sure that you try these whenever there is a Wi-Fi connectivity issue.
If there is anything that you want to talk about or have a doubt about, you can mention those in the comment section.